
A heavy bag should be a dependable training partner, not a source of frustration. Yet, many athletes contend with jarring impacts that hurt their wrists or inconsistent filling that settles into a rock-hard base. The question of what to fill a heavy bag with is more than a simple choice; it is an engineering decision that directly impacts performance, safety, and the long-term durability of your equipment. An improperly filled bag compromises your training and puts you at risk of injury.
This guide provides the definitive answer. We apply our expertise in material handling to analyze the best and worst fillers, from traditional textiles to modern alternatives. You will learn how to achieve the ideal weight and density for your training goals, creating a bag with a consistent, satisfying feel that protects your joints and maximizes every strike. Prepare to move beyond guesswork and build a high-performance heavy bag engineered for reliability and built to last.
Key Takeaways
- Understand how your choice of filler material directly impacts the bag’s final weight, density, and performance during training.
- Learn the correct, step-by-step packing method to ensure even distribution and prevent dangerous hard spots from forming over time.
- Discover the answer to what to fill a heavy bag with to customize its feel for specific goals, from high-impact conditioning to precision striking.
- Implement simple long-term maintenance techniques to extend the life of your bag and guarantee consistent, reliable performance.
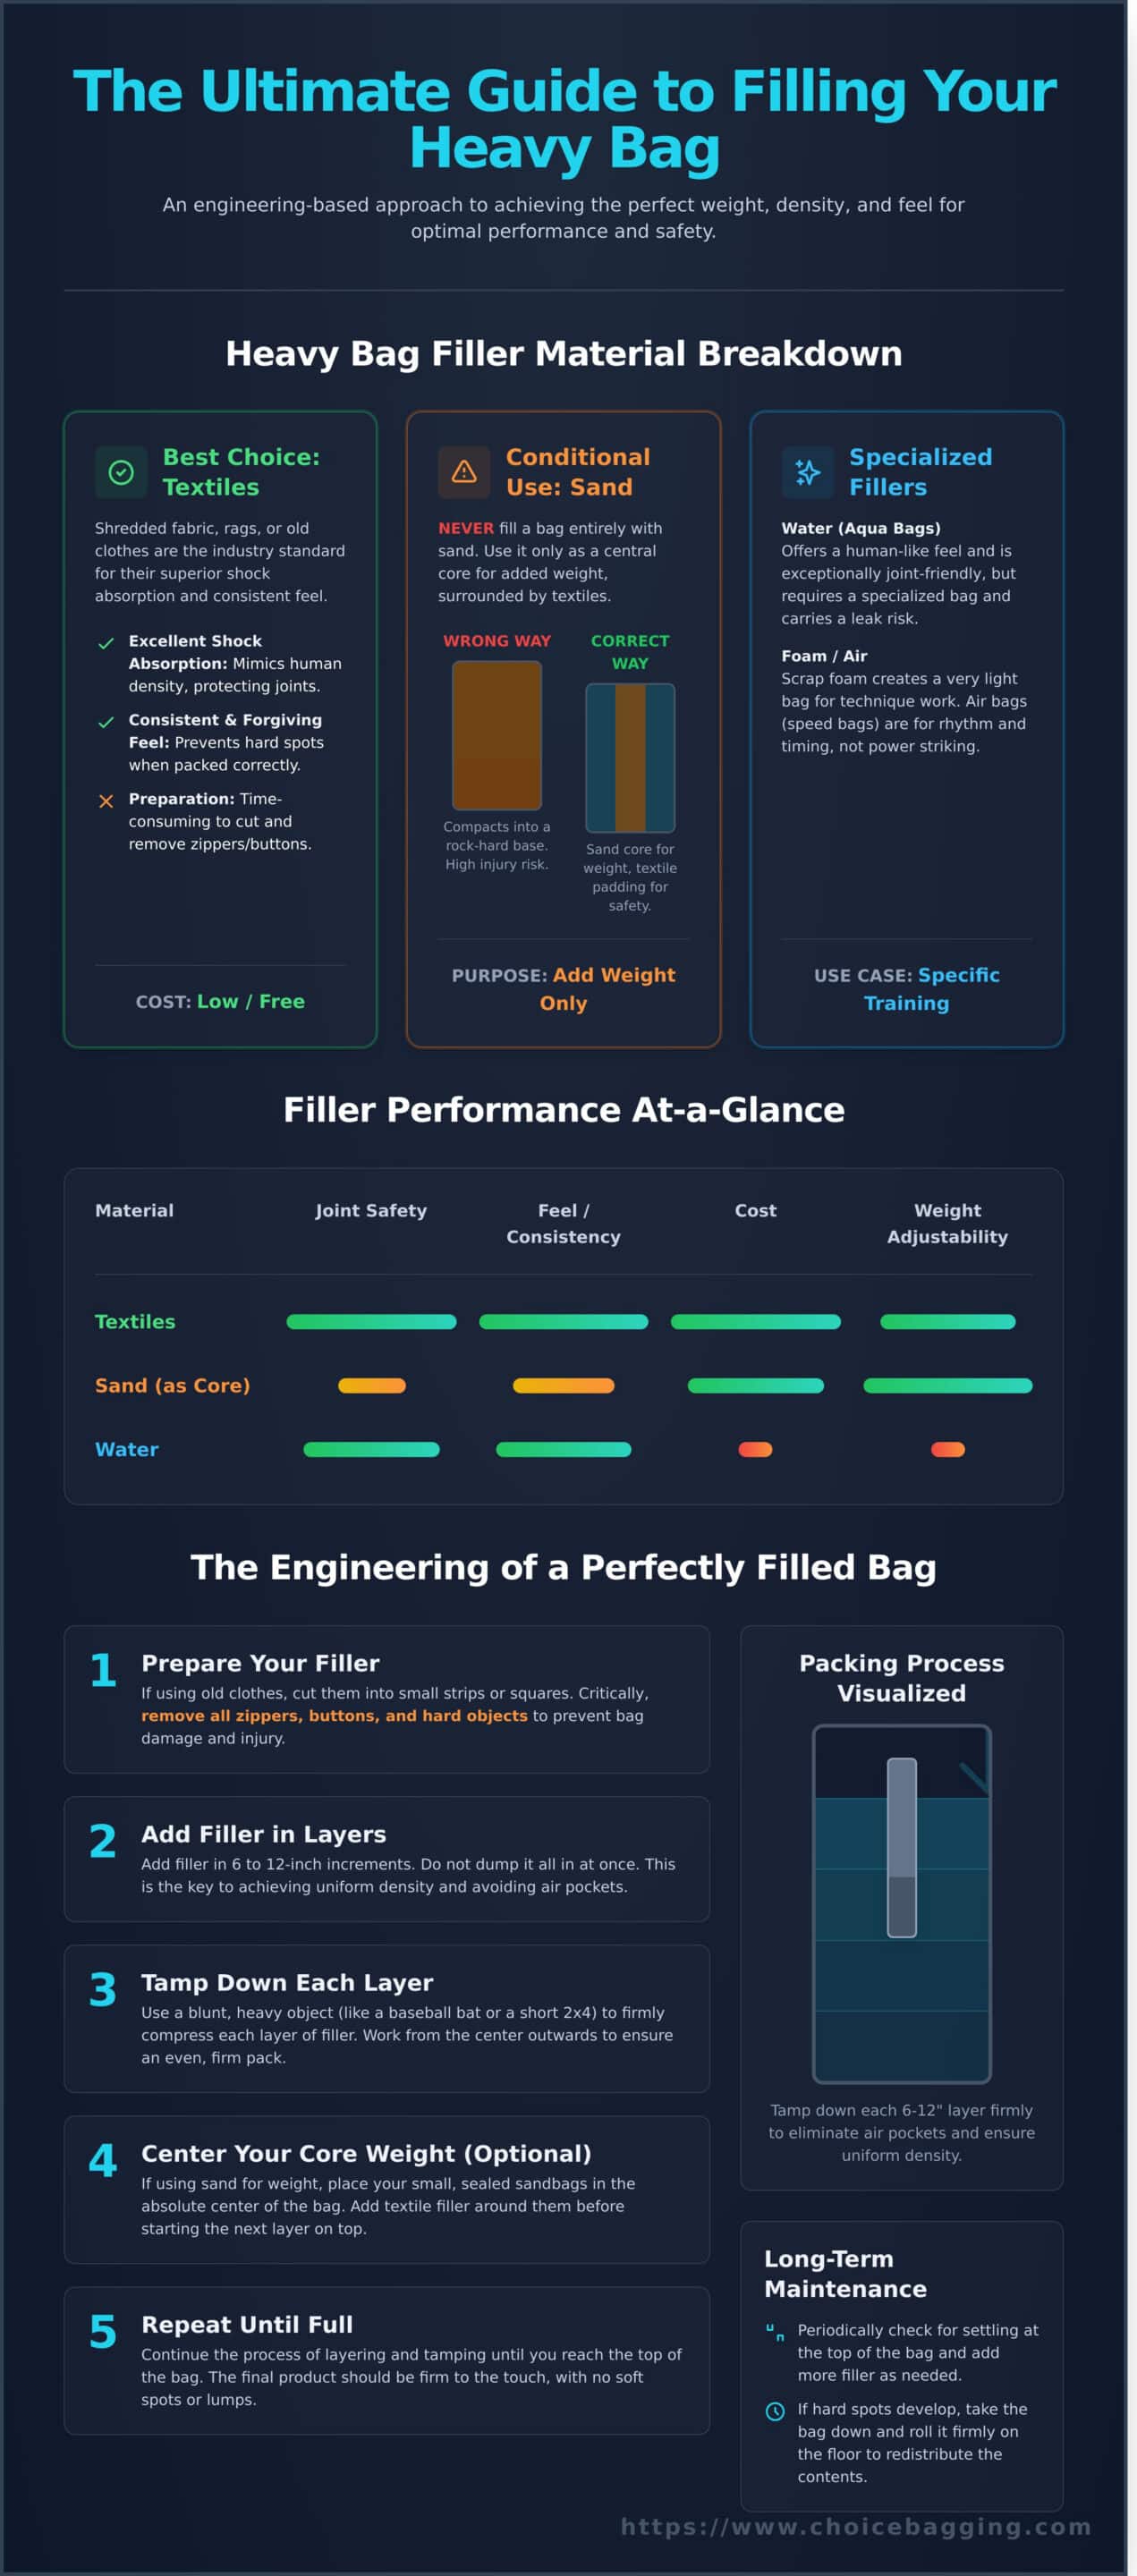
The Top Heavy Bag Fillers: A Material-by-Material Breakdown
Selecting the correct filler for a heavy bag is a critical decision that directly impacts its performance, durability, and most importantly, your safety. The material you choose dictates the final weight, surface hardness, and swing dynamics of the bag. A properly filled bag provides excellent resistance and protects your joints from unnecessary impact, while an improperly filled one can lead to hard spots and potential injury. Answering the question of what to fill a heavy bag with begins with understanding your training goals and prioritizing long-term joint health.
For a practical demonstration of the filling process, view this guide from industry professionals:
To provide at-a-glance information, here is a breakdown of common filler materials:
- Material: Textiles (Old Clothes/Rags)
Cost: Low/Free
Feel: Firm but Forgiving
Pros: Excellent shock absorption, consistent feel, easy on joints.
Cons: Can be time-consuming to prepare if doing it yourself. - Material: Sand (Used as Core Weight)
Cost: Low
Feel: Very Hard/Dense
Pros: Adds significant weight efficiently.
Cons: Compacts into rock-hard spots if not used correctly. - Material: Water
Cost: High (Requires specialized bag)
Feel: Human-like Resistance
Pros: Superior shock absorption, very joint-friendly.
Cons: Risk of leaks, weight is not adjustable.
Best Choice: Textile Fillers (Shredded Fabric, Old Clothes)
This is the industry standard for a reason. Pre-filled bags from trusted manufacturers almost exclusively use compressed textile scraps. This material provides superior shock absorption, closely mimicking the density of a human opponent and reducing strain on your wrists and shoulders. For a deeper look into traditional Punching bag construction and materials, historical context shows rags have been a primary filler for decades. You can source this by purchasing pre-shredded fabric or repurposing old clothes. If preparing your own, ensure you cut material into strips and diligently remove all zippers and buttons.
Conditional Choice: Sand and Sawdust
A common but critical mistake is filling a bag entirely with loose sand. Over time, the sand compacts at the bottom, creating a surface as hard as concrete that can easily lead to injury. The correct method is to use sand as a core weight. Fill small, sealed bags with sand and place them in the center of the heavy bag, surrounded by textile filler. Sawdust is a lighter alternative but carries a significant risk of absorbing moisture, which leads to mold and uneven weight distribution.
Alternative Fillers: Foam, Water, and Air
For specialized training, alternatives offer unique benefits. Scrap foam provides a very light, cushioned feel, ideal for technique-focused work. Water-filled bags (aqua bags) are exceptionally joint-friendly due to their impact absorption but carry an inherent risk of leaking. Finally, air-filled bags, like speed bags, are not heavy bags; their purpose is to develop rhythm and timing, not to absorb power strikes.
The Engineering of a Perfectly Filled Bag: Lessons from Industrial Packaging
Since 1978, we have specialized in the science of filling bags with precision and reliability. While our equipment handles industrial-scale operations, the core principles of material management apply directly to your heavy bag. The answer to what to fill a heavy bag with is less about the specific material and more about controlling its properties. A perfectly filled bag is an exercise in engineering, focused on achieving uniform density, preventing compaction, and managing flowability-the same challenges we solve for our partners every day.
Achieving Uniform Density
An unevenly filled bag with lumps and hard spots is not just ineffective for training; it’s a safety hazard that can lead to injury. The key to a consistent striking surface is methodical layering. By adding your chosen filler in 6 to 12-inch increments and firmly tamping down each layer with a blunt object like a baseball bat, you eliminate air pockets and ensure even distribution. This process, detailed in many a step-by-step guide to filling a heavy bag, is critical. This principle of controlled filling is exactly how our valve bag fillers operate, ensuring every bag meets precise density specifications for unmatched consistency.
Preventing Settling and Compaction
Over time, gravity will cause fine, dense materials like sand to settle at the bottom of your bag, creating a rock-hard base. To combat this, using textile scraps is highly effective. The interlocking fibers of shredded fabric or clothing create a stable matrix that resists compaction. For those who want the added weight of sand, the best practice is to contain it in sealed bags and place them in a central core, surrounded by softer textiles. This isolates the dense material, preventing hard spots from forming on the striking surface.
Managing Weight and Volume
The type of filler you choose directly determines the final weight and feel of the bag. Lighter materials like textile scraps create a more forgiving bag, while sand or sawdust adds significant mass for resistance training. As a general rule, you can expect to use about 5-7 lbs of shredded clothing per foot of bag height. Understanding this relationship is crucial when deciding what to fill a heavy bag with. In our world, this same calculation is essential; our high-performance bulk bag fillers are engineered to handle immense volumes and weights with extreme accuracy, ensuring every industrial bag is filled to its exact specification.
Step-by-Step Guide: How to Fill Your Heavy Bag Correctly
Properly filling a heavy bag is a process that demands precision and patience. The final performance and durability of your equipment depend on getting this stage right. Rushing the process will result in an uneven, lumpy bag that offers poor feedback and can even lead to injury. This guide provides a systematic, industrial-grade method to ensure your bag is filled for optimal density, weight, and longevity. Following these steps is just as crucial as deciding what to fill a heavy bag with in the first place.
Step 1: Prepare Your Bag and Workspace
Before introducing any filler material, a clean and organized workspace is essential for an efficient and clean process. Proper preparation prevents contamination of your filler and simplifies cleanup, ensuring a professional result.
- Inspect the Bag: Ensure the heavy bag is completely empty and free of any debris from manufacturing or shipping. A quick wipe-down of the interior is recommended.
- Protect Your Area: Lay down a large tarp or heavy-duty plastic sheeting. This will contain any spills from your filler material, making the process significantly cleaner.
- Assemble Your Tools: Have your compacting tool, such as the end of a baseball bat or a short, thick dowel, within arm’s reach.
Step 2: The Layering and Tamping Method
The key to a uniformly dense heavy bag is not speed, but methodical layering. Each layer must be added and compacted deliberately to eliminate air pockets and prevent the contents from settling over time. This creates a consistent striking surface that performs reliably.
Begin by adding the first 6-12 inches of your chosen primary filler, such as textile scraps. Use your tool to tamp the material down firmly, paying special attention to the outer edges to create a solid, cylindrical base. This compaction is critical for performance, as it ensures the bag can correctly manage impact forces, a principle grounded in the physics of shock absorption. If you are using a weighted core like a sandbag, place it in the center on top of this base. Continue adding filler in 6-12 inch layers, tamping each one down thoroughly before adding the next.
Step 3: Finishing and Sealing the Bag
The final steps secure the contents and give the bag its final shape. Once you near the top, overfill the bag by one to two inches. The filler will compress when you seal the lid, and this extra material ensures the bag remains taut and full. Distribute this top layer as evenly as possible before zipping or lacing the bag shut. Once it is securely sealed, lay the bag on the floor and roll it back and forth firmly. This final step helps to even out any minor inconsistencies, delivering a high-performance, professionally filled heavy bag.
Customizing Your Heavy Bag for Specific Training Goals
A generic, off-the-shelf heavy bag often fails to meet specific training demands. The question of what to fill a heavy bag with is not merely about adding weight; it is about engineering a responsive and effective training partner. The composition of your filler and its packing density are the two primary variables you can control to customize bag performance, directly impacting your development as an athlete. By tailoring your bag’s characteristics, you transform it from a simple target into a precision training tool.
For Power and Strength Development (Boxing, Muay Thai)
The primary goal for power training is a heavy, dense bag that absorbs powerful strikes with minimal swing, providing maximum resistance. To achieve this, we recommend a layered combination of materials. The core should consist of a tightly sealed sandbag or a bag of rubber mulch to create a dense center of gravity. Surround this core with tightly compressed textile scraps, rags, or sawdust.
This configuration creates a high-mass target that forces the development of true power. Striking the bag feels solid and impactful, which helps condition and strengthen bones, tendons, and muscles. The minimal sway allows for repeated power shots and heavy combinations without needing to constantly reset, ensuring a more efficient and focused workout. This setup is the professional standard for athletes focused on developing knockout force.
For Speed, Cardio, and Precision (Fitness Boxing, Karate)
When the objective is speed and endurance, the ideal bag is lighter and more responsive, offering significant movement and a quick rebound to challenge timing. For this application, use exclusively lightweight materials like shredded fabric, old clothing, or specialized poly-fiber fill. For an even lighter bag, you can mix in shredded foam. The key is to pack these materials less densely than you would for a power bag.
A lighter fill creates a bag that moves and swings, forcing you to manage distance, improve footwork, and sharpen reflexes. The quick rebound is ideal for high-volume combination drills and cardiovascular conditioning, keeping the pace high. This setup effectively simulates a mobile opponent, making it the superior choice when your training priority is speed, accuracy, and endurance over brute force.
Ultimately, your choice of what to fill a heavy bag with translates your training intent into tangible results. Achieving the correct packing density and material consistency is key to performance-a principle that applies to both athletic training and industrial applications. For dependable bagging systems built on precision, view our high-performance equipment.
Long-Term Maintenance: Keeping Your Bag in Fighting Shape
A properly filled heavy bag is a high-performance piece of equipment, not a ‘set it and forget it’ item. Just as important as knowing what to fill a heavy bag with is understanding how to maintain it for consistent performance and longevity. Regular upkeep prevents filler compaction, extends the life of your bag, and ensures you get the maximum return on your investment in durability.
Regular Inspection and Rotation
To ensure unmatched reliability, we recommend a simple maintenance schedule. Every six months, perform a thorough inspection of your heavy bag. This proactive check is key to identifying minor issues before they impact performance.
- Check for Hard Spots: Feel the entire surface for lumps or excessively hard-packed areas, which most commonly form near the bottom of the bag.
- Rotate the Bag: Turn the bag 180 degrees so that your primary striking surface changes. This distributes wear evenly across the bag’s exterior and internal filler.
- Listen for Irregularities: Lift and gently shake the bag. Listen for any unusual sounds that could indicate significantly shifted internal weights or objects.
How to ‘Re-fluff’ a Compacted Bag
Over time, the material you chose for what to fill a heavy bag with will inevitably settle due to gravity and repeated impacts. This can lead to a soft, underfilled top and a rock-hard, potentially dangerous bottom. Fortunately, these issues are easy to address with preventative care.
- For a Soft Top: Simply unzip the bag and add more of your chosen filler, tamping it down to match the existing density.
- For a Hard Bottom: Unhook the bag, lay it on its side, and firmly roll it back and forth on a hard floor. This action helps break up the compacted material.
- For Severe Compaction: In some cases, the most efficient solution is to empty the bag completely and refill it, ensuring an even distribution from the start.
Just like high-performance industrial gear, preventative care prevents costly failures. It’s the same principle behind our expert field service-maintaining equipment integrity for long-term, reliable performance. By investing a few minutes every few months, you ensure your heavy bag remains a durable and effective training partner for years to come. For industrial equipment built to last, contact Choice Bagging Equipment today.
From Training Bag to Industrial Scale: The Principles of a Perfect Fill
As we’ve explored, the answer to what to fill a heavy bag with extends far beyond a simple choice of material. Achieving peak performance, realistic feedback, and long-term durability depends on a truly engineered approach. This means selecting the right filler for your specific training goals and, just as critically, meticulously layering and compacting it to prevent settling and dangerous hard spots.
These same principles of density, flow, and material consistency are what we’ve perfected on an industrial scale. As material handling experts since 1978, Choice Bagging Equipment is trusted by industrial leaders for delivering reliable, high-performance bagging solutions. We build performance to last, and all our equipment is proudly Made in the USA. While we master filling industrial bags, the principles of material handling apply everywhere. For your industrial bagging needs, contact our experts.
Now, take this knowledge, fill your bag with precision, and train with confidence.
Frequently Asked Questions About Heavy Bag Filler
How much filler material do I need for my heavy bag?
A reliable rule of thumb is 1.5 to 2 pounds of textile filler per vertical foot of your bag. For a 6-foot bag, you would start with 9 to 12 pounds of rags. However, the final amount depends on the material’s density and how tightly you pack it. For denser fillers like rubber mulch, you will use significantly more weight to fill the same volume. We recommend measuring by volume first, then adjusting the density to achieve your target weight and performance.
Is it a good idea to mix sand directly with clothes or rags?
We strongly advise against mixing sand directly with textile fillers. Over time, the sand will settle to the bottom of the bag, creating a rock-hard, unsafe striking surface that can cause injury and damage the bag material. For reliable weight distribution and maximum durability, always contain sand in sealed, heavy-duty plastic bags or durable canvas pouches before placing it within the core of your primary filler material. This ensures consistent performance and safety.
What is the absolute cheapest way to fill a heavy bag?
The most cost-effective solution is typically recycled textile scraps, such as old clothing, rags, or bedding with all zippers and buttons removed. Sawdust is another low-cost alternative. When considering what to fill a heavy bag with on a strict budget, these materials are the standard. Be aware that they require meticulous packing to prevent settling and will result in a lighter bag compared to professional-grade fillers, which may require future adjustment.
Can I use rubber mulch or pellets to fill my bag?
Yes, granulated rubber mulch is an excellent high-performance filler. Its uniform size and density prevent the settling and hard spots common with other materials, ensuring a consistent and reliable striking surface for the life of the bag. Rubber provides superior shock absorption, which increases the bag’s durability and reduces impact on your joints. For a long-lasting, professional-grade fill that maintains its properties over years of intense use, rubber mulch is a dependable investment.
How do I add weight to a heavy bag that is already filled?
To add weight to an existing bag, you must create a dense central core. Carefully remove some of the existing filler from the center of the bag’s opening. Insert one or more sealed, durable bags filled with sand or rubber mulch into the cavity you created. Then, tightly pack the original filler material back around this new weighted core. This method ensures the weight is distributed centrally, maintaining the bag’s balance and performance integrity.
Why do some people recommend using rice or beans as filler?
Rice and beans were historically used as filler due to their density and availability before specialized materials became common. However, we do not recommend this practice for modern equipment. These organic materials absorb moisture, leading to mold, rot, and pest infestations. They also break down and compact into a concrete-like mass over time, creating an unsafe and unusable bag. For equipment durability and user safety, always use inert, stable materials.
Recent Comments